Street photography is one of those sexy styles of art that many think are reserved for retired photographic professionals with $12,000 camera systems, so many don't even give it a shot. Those enthusiastic enough to make it onto the street with camera in hand though carry high levels of expectation, which they will not live up to. More than likely, someone trying street photography out for the first time will give up just as quickly as they started.
The reality is, it's just like any other form of art; it's a magic show that once you've learned a few clever tricks for, you've made it. From there, you can start to find your niche, perfect your skills, and ultimately begin to find more enjoyment and appreciation in it all.
This guide will make you a decent street photographer in a few simple steps.


@steveseguin
The reality is, it's just like any other form of art; it's a magic show that once you've learned a few clever tricks for, you've made it. From there, you can start to find your niche, perfect your skills, and ultimately begin to find more enjoyment and appreciation in it all.
This guide will make you a decent street photographer in a few simple steps.
Step 1
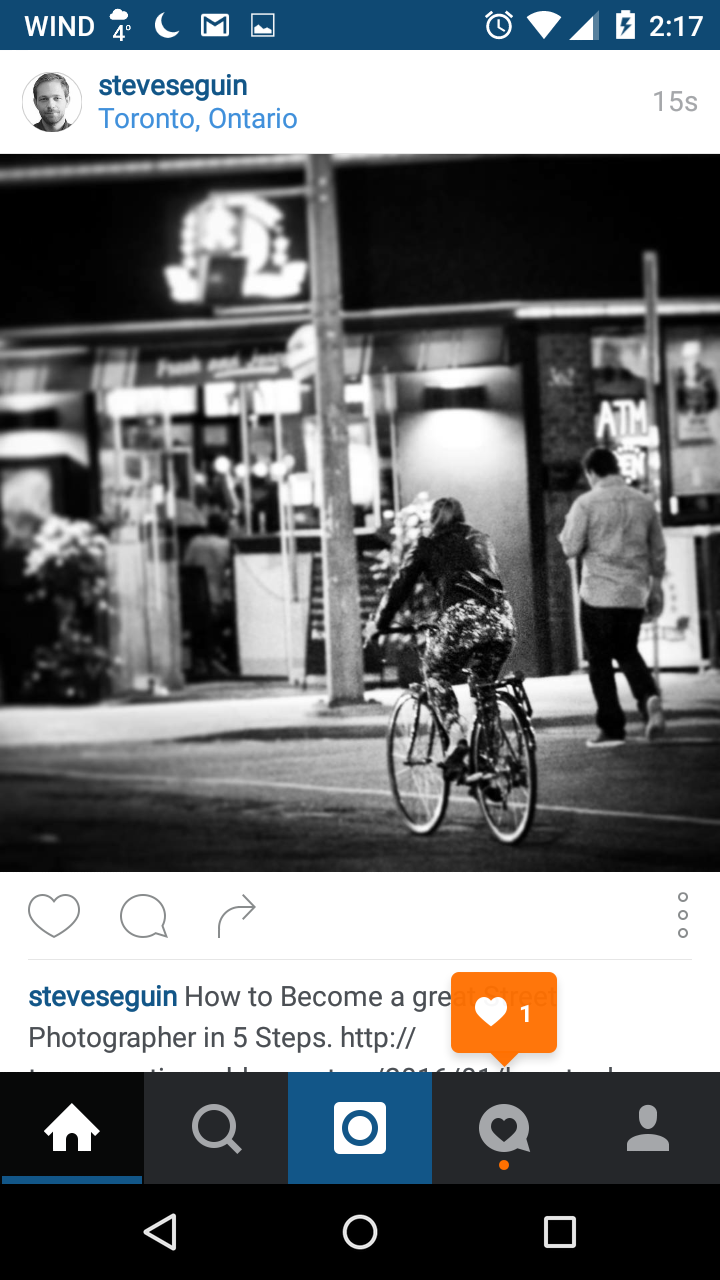
Take a photo on the street of a person; doesn't matter which camera you use. An iPhone works even. It is preferable that the person looks worse off than yourself. It is preferable that the subject is doing something mundane, even if that is just staring at you, taking a nap, or pushing a cart.

The above photo follows these rules. I often find Chinatown to have a lot of street-side activity going on, with people who look worse off than myself. Like, who buys tomatoes on the street?
If you are at your computer and already have a photography collection, just upload all your photos to Google Photos. Once done, search for the word "street", and Google will showcase a selection of great choices. Pick one randomly. Below is a randomly selected one from my own collection; it is not in focus, with high ISO noise and motion blur, but who cares, it adds to the effect.

Step 2
Open Instagram and load the image.
Step 3
Chances are you are going to make some basic mistakes with your first photo attempt; that's okay -- Instagram can fix all mistakes via software. Below represents one common mistake -- the object of focus is in the very center of the image. This breaks what artists call the rule of thirds, and that means absolutely nothing, because great artists break that rule all the time. Since your photo does not contain a near-naked beautiful women however, we all assume that you are not a great artist, so just stick with the rules for now.

To correct the above image, we will just crop the photo in Instagram by pinch zooming and panning around in the image. While just moving the object of focus out of the center of the image is often enough, Instagram will assist by providing you a 3x3 grid for exactness. This grid aids you in moving the object of focus to an intersection point on that grid, which is considered ideal positioning.
The following image demonstrates what the image looks like after zooming in a bit and putting the target of focus over an intersection point on the provided grid. It looks so much better already, and only you know why -- good job!

Step 4
After cropping and shifting the image a bit with Instagram, we are onto the next step, also in Instagram -- adding a layer of contrived emotion by using software FILTERS. People are stupid and can't help but feel nostalgic or some shit when they see grainy, high-contrasty images; it also helps in hiding photographic errors, so lets do that next.
You really do have your choice of filters here, but lets stick to a simple recipe for now. We're going to...
- Select INKWELL as our main filter
- Increase LUX to 100%
- Set STRUCTURE to 25%
- Set VIGNETTE to 100%

Step 5
We're pretty much done at this point, but if you still feel the image is lacking interest, you can rotate the image a few degrees to add a feeling of ANGST to the image; the more you rotate, the stronger it comes on.
For me however, I try to do the opposite; I try to simplify the image and bring more focus to the object of interest; sometimes the rule of thirds just isn't enough. To do this, I use the tilt shift effect in Instagram.
The object with tilt shift is to blur out everything except for the object of interest, trying to make sure it doesn't look too odd. Professional photographers pay thousands of dollars for their lenses to achieve essentially the same effect; funny, eh?

Step 6
And that's it! Upload away. Be sure to hashtag the image to high hell, as it makes you look like you know what you're doing, and watch the likes roll in. Pay for a few Instagram bot services to help you grow your account if you can afford, as a lot of followers implies to your audience that you are awesome. If people think you're popular, you could post crap like this all day long and no one will question it. It's like an overpriced bottle of wine -- it must be good if it's expensive!

And lastly, the other two photos done up the exact same way; one of which I added a 6-degree tilt to for added ANGST.
"Is he going to steal that apple?! OH NOES".


@steveseguin
Comments